Bernat blanket fingerless mitts!

26 Oct

New free pattern!  I made it up at work because I was cold and I had blanket yarn…

You need 1 ball of blanket yarn (a 108 yd ball gave me 5 fingerless mitts), a P hook.

Ch 15.  Make sure it fits your wrist. If needed, ch more.   Leave a longish tail, you’ll need it for seeming.

Single crochet each stitch.  Rows 1-4 are just single crochet.


Somewhere in row 5, increase one stitch.  That’s for the thumb.

Rows 6, 7, 8 single crochet each stitch.

Rows 9 and 10 decrease one stitch somewhere.  

Row 11 single crochet.  Cut yarn, leaving a longish tail and bind off.


To seam up, place your non-dominant hand inside and start weaving the tails up the side.


You can seam it up two ways…one where it’s at the knuckles, or where it’s over the knuckles. Seam it up and place it on your hand and make the second!


And yes, that’s Harry Potter in the background. 

Book review: The Eternal War

10 Aug

The Eternal War is written by fellow nerdfighter Ashley Tia Long, who lives near Flint, MI.

I received the book for free for reading and reviewing.

The book is about good and perceived evil, The Almighty and Lucifer.  We are pawns in their game of chess.

I really enjoyed the book, it made me think more about the Christian religion I was brought up in – we were taught that Satan is bad and worshipping him is ‘unheard of’ and that God will take care of us and loves us and wants only good for us.  But the God (The Almighty) in the book was not the pure God we are taught about in the Bible. 

He decieved people, lied to them, and only wanted himself to be in power, not to rule alongside his brother, Lucifer.

I can’t spoil the ending for you, however it had a nice twist, I thought, didn’t end the way I wanted.

The author wrote the characters well, I felt their pain at times and at others their happiness and peace.  

I liked how the story was told thru various centuries, showing how people believe in their higher power for long periods of time.

I read the book in about 3.5 hours, but I am a fast reader and it was a very interesting book.  I couldn’t put it down and stayed up way too late.  I think that is the sign of a really good book.

Stuffed bell peppers!

2 Apr

So i bought ground beef and 4 bell peppers a week ago with the intention of making stuffed peppers last week.

That fell thru.  So I made them today!  In the middle of the afternoon!  Because I’m odd like that…

Gather your ingredients!

IMG_5652

1 lb beef

IMG_5653

Part of an onion – i used 1/2 of the 1/2, so quarter.

Spices – salt, pepper, garlic (like minced, not powder), cumin.

IMG_5654

Bell peppers!  I used 4, and the amount of filling fit perfectly!

IMG_5659

1 cup cooked rice!  I didn’t have any instant on hand, and time management is *not* my  thing, so i didn’t have time to use the rice cooker and make real rice, so i used these boil in a bag jasmine rice things.  each bag makes like 1.5 cups, so i used 1 cup and ate the rest.

IMG_5655

Brown the beef, add in parts of the lopped off tops of peppers, onion, garlic minced, spices.

IMG_5656

Lopped off peppers – i picked one that would stand up on their own.  this is in an 8×8 pan.

once beef is well browned and the pepppers/onion had a chance to cook a bit – and you added your rice (not pictured cuz lazy), fill peppers with filling.

IMG_5661

Stick in oven at 370*F for 30 min.

Add cheese, i used colby jack cuz i have it on hand, and then cook for 15 more min!  (should probably be less cuz my cheese was all crispy. not gooey).

IMG_5662

IMG_5663

Eat!

And then clean up the kitchen.  *nods*

How to add another color knitting in the round

1 Apr

So when you are knitting in the round and you want to add another color – so you can do single row stripes, it’s pretty easy to do.

However, tutorials are awesome and I like writing them!

IMG_5620

I have been on a striped hat kick.  This, the harry potter house colors, other sports team colors, etc.  Hats.

So you start by knitting your brim.  I use size 7 or 8 16″ circular needles, 96 stitches and a k3 p1 rib.  About 6-7 rows = brim

IMG_5595

Get your second color out and attach by making a stitch.  So my second color is white.  Do not cut the green, however, you’re gonna want it in 96 stitches (1 row).

IMG_5602

Knit the entire row in white, as you would (no ribbing, just knit).

IMG_5603

Without cutting the white, pick up the green you didn’t cut and knit a row with it.

IMG_5607

The backside (inside) looks a mess, but thats okay!

IMG_5608

Then knit a row in white, with the color you didn’t cut.

Keep going in this fashion until the hat measures 7″.  Then start your decrease.

*K6 K2tog*.  Knit a row.  *K5, K2tog*.  Knit.  *K4 K2tog*.  Knit. *K3, K2tog*.  Knit.  *K2, K2tog*.  Knit.  *K1 K2tog*.  Knit.  *K2tog*  *k2tog*  Cut tail (6-7inches), put tail on darning needle, thread thru the remaining stitches, pull tight and weave ends in.  (* means repeat)

At about the k3 k2tog row i switch to only one color, makes decreases easier.

Voila, Hat!

Magic Loop Knitting

18 Mar

So there are two ways of knitting something in the round – circular needles and double pointed needles (dpn).  I have never been able to figure out how to use a set of double pointed needles, so I got really good at magic looping with circular needles.

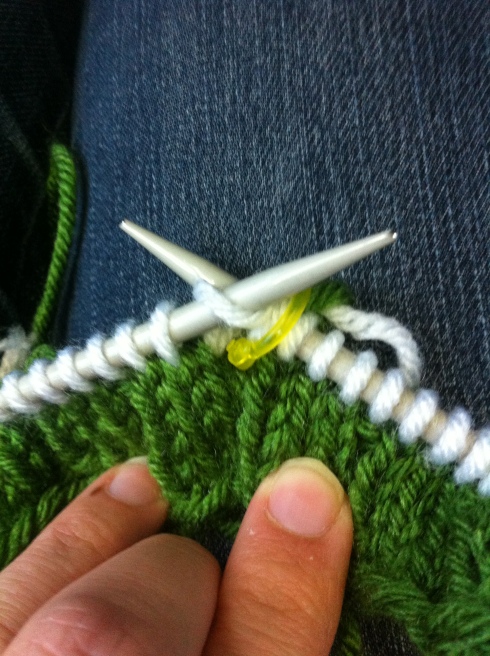
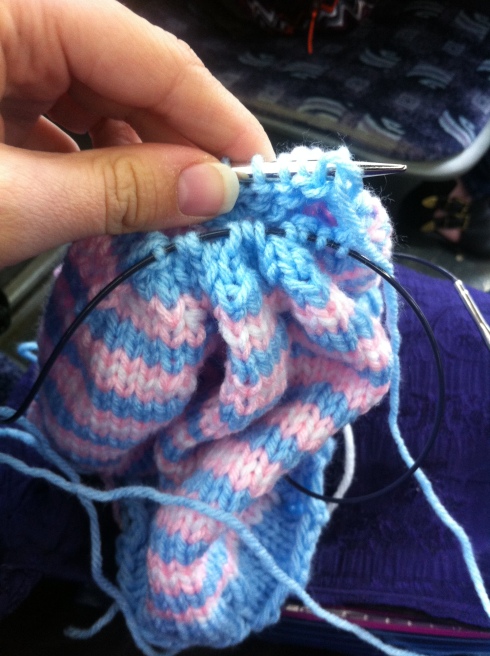
You magic loop when your piece of work (art, fabric, whatever) gets too be too small for your circular needle cable.  In the pictures below, I am working on a hat – the decreases got to be too small – too few stitches for how much cable i had – so I transferred the stitches from the 16″ circular to the 32″ circular.  You can magic loop with any length circular, it is better to have too long than too short.  In a pinch i have used the same 16″ i was knitting the hat on, but I do not recommend.

tutorials!

Someone on my favorite facebook group asked how to do a magic loop.  I was in the process of getting ready to do that on a hat i was knitting, so i took pictures, posted them on the post.  Then she goes “You should make tutorials!”  So here you go.

So you’ve got this thing your knitting, in my case a hat.  You’ve got too few stitches for the amount of cable you have on your needle.  So you’re going to want to knit the stitches onto the longer circular needle.  In my case the grey needle is a 16″ circular, the metal/shiny needle is the longer circular (i think its 28 or 32″ long)

IMG_5300

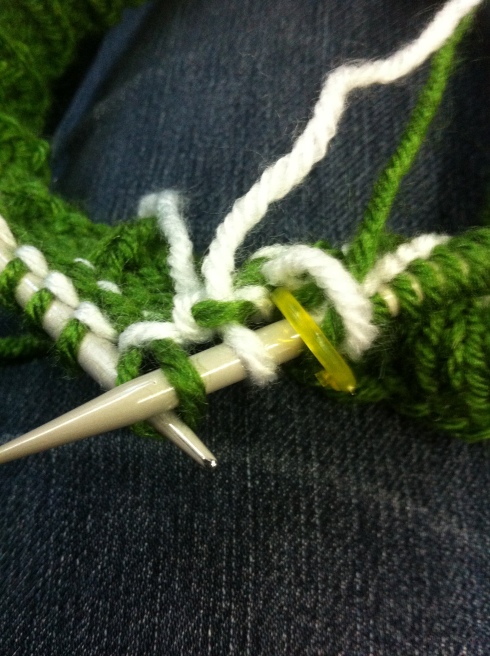
So you awkwardly (and yes, it is awkward) knit the stitches from the short needle to the long needle.  Eventually it’ll get too hard to knit, so you’ll pull the stitches onto the cable.

IMG_5301

Pull the stitches onto the cable of the longer needle and then keep knitting with the longer needle till you have all your stitches onto it.  Put the shorter needle somewhere else.  Since i’m doing this on the bus, I put the shorter needle into my backpack.

IMG_5302

(sorry for the blur, i’m doing all this knitting on the bus!)

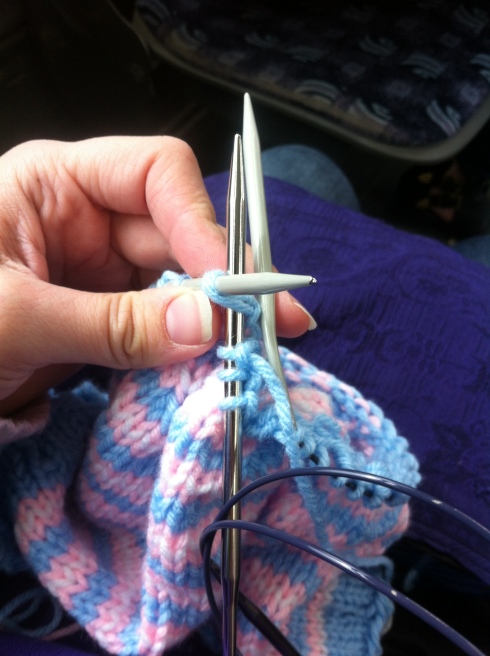
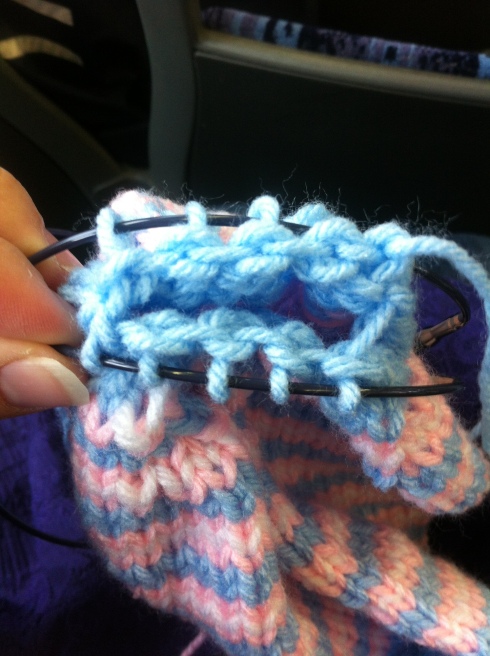
So you’ll have all your stitches on the longer needle.  Put them in the middle of the longer one.  Count the stitches (here i have 21, but i’ll fix it by putting 11 on one side and 10 on the other then k2tog’ing 2 on the 11 side together), put half on one side, half on the other and pull the cable out so theres a loop.  Magic. Loop.

IMG_5303

The needle you are knitting with will always be the bottom needle.  the “top” needle will actually be on the side, the stitches will stay on the cable, but be parallel(ish) to the ones you are knitting.  Knit them.

IMG_5304

Now you need to flip it – so that the stitches you are to knit are on the bottom and shove the cable into the bottom stitches so you see the needle and pull out the needle from the top stitches so you have cable.

IMG_5305

IMG_5306

This is what it looks like while you are knitting – a loop on each side.

IMG_5307

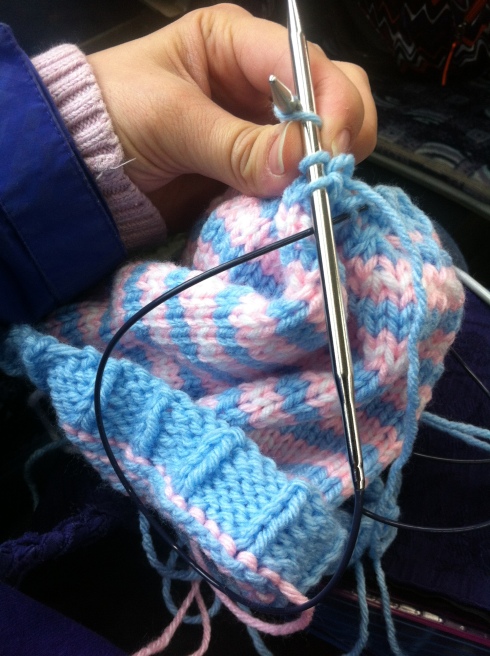
You will always have a box.  I wanted 3 stitches on each “needle” to finish off my hat, so I k2tog, k1, k2tog’d each side.  Then cut my tail, and threaded the yarn thru the stitches and wove in ends.

IMG_5310

DONE!

IMG_5309